tech.jpg)

(Please note that this is an old post and that the PiStorm project has moved on from the Musashi firmware that I'm using for this post.)
From the first time I heard about the PiStorm project I was intrigued. For readers unfamiliar with the PiStorm, it is a small-ish board that is designed to be plugged directly into the MC68000 CPU socket of the Amiga 500(+)/1000/2000. The other side of the board allows a Raspberry Pi (either a Pi 3 Model A+ or Pi Zero 2W) to be plugged in. Software running on the Pi make it act like a fast 680x0 (and run the Amiga) and at the same time also offer other functionality.
I was intrigued, but since it was not suitable for my Amiga 1200 I just kept it in the back of my mind. While I like using the 500, it just takes a little bit more space on my desk than the 1200, which makes my workspace feel cramped since I also need space for the keyboard of the PC that is my daily driver. Also, when I use the 500 it is usually to watch old demos. These don't usually play ball with faster processors. The "Desert Dream" demo by The Kefrens is one where the timing of the intro is off on anything faster than the stock 68000. Since the PiStorm sits in the CPU slot inside the machine it means opening the system if I want to switch back to a standard 68000, which felt a bit cumbersome.
And then I learned of the LazarusStorm project, which created an external board that plugs into the big slot on the left hand side of the 500 and provides a socket for accelerators like the PiStorm to be plugged into. This allows me to use the PiStorm externally on the 500, so I can unplug it when I want the 500 to be completely original again.
The hardware
Originally the PiStorm accepted the Raspberry Pi 3 Model A only since the USB ports of the "B" models stop the PiStorm board from fitting physically. The original Pi Zero did physically fit but was too low on specifications to make it useful. The newer Pi Zero 2W has better specifications than the original Pi Zero and is now fully supported too.
The component shortage at the moment is making Raspberry Pi boards difficult to acquire so I'm using the same Pi Zero 2W board as I used for the RaSCSI. The main difference is that the Zero is clocked at 1GHz, where the 3 Model A+ is clocked at 1.4GHz. I expect that a PiStorm with a Pi 3 Model A+ will run about 40% faster than one with a Zero 2.
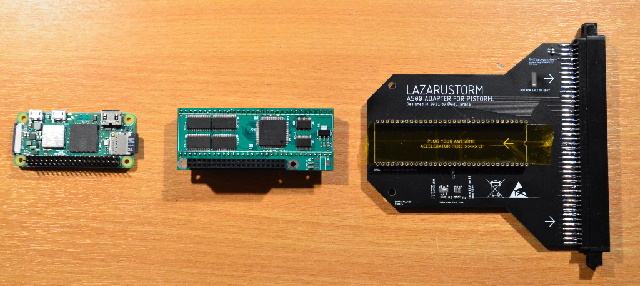
The photo below shows the Raspberry Pi zero 2W on the left, the PiStorm board in the middle and the LazarusStorm on the right, all ready for assembly.
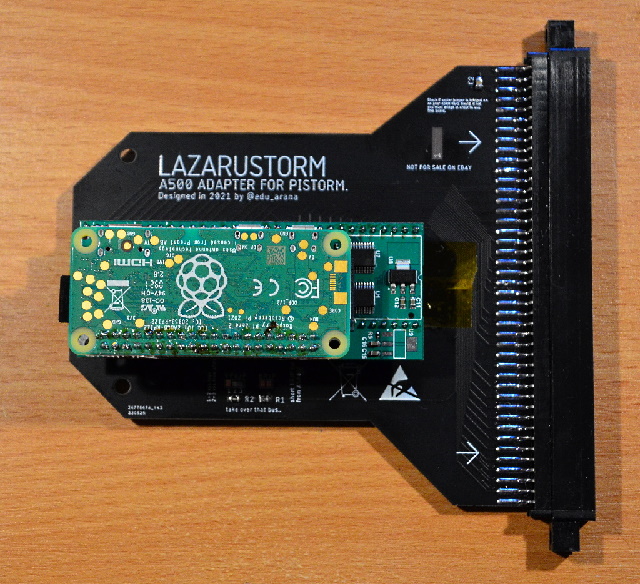
With the Raspberry Pi Zero 2W plugged into the PiStorm board and the PiStorm plugged into the LazarusStorm the whole sandwich of boards looks as follows:
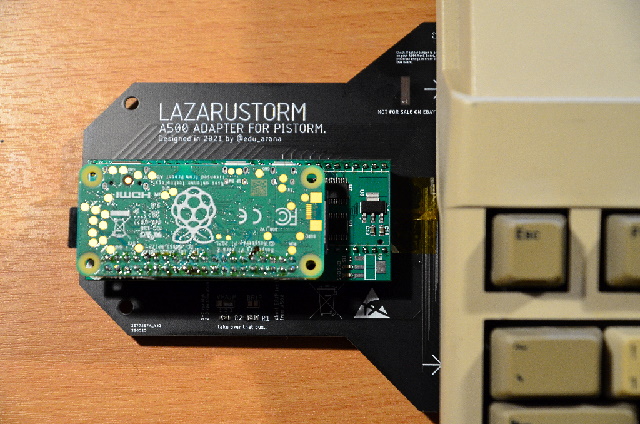
Now fully assembled the LazarusStorm can be plugged into the left hand side expansion slot of the Amiga 500. For me this means that I had to remove the MacroSystem harddisk controller, but since I had to take the Pi Zero 2W out of that already it does not matter. The photo below shows everything plugged in:
The one additional thing I needed to do was closing jumper JP6 on the mainboard of the Amiga 500. This is explained on the project's Github page and does not interfere with normal operation of the system. Unplugging the LazarusStorm from the 500 re-enables the internal 68000 CPU and the system is back to normal stock functionality and timing.
The software
The PiStorm wiki has a great guide on how to install the software. The only thing I'd like to add is that the guide expects the base Raspberry Pi OS installation to be one of the "Buster" releases and not one of the newer "Bullseye" releases. I therefore created the initial image by using one of the older "lite" images and then ran "apt update && apt upgrade" to update Raspberry Pi OS before installing the actual PiStorm software.
The PiStorm offers a lot of additional functionality to the Amiga, which can all be controlled via the documented configuration file. The following sections will highlight some if this functionality since some of it goes beyond what traditional accelerator boards add.
The CPU
The main function of the PiStorm software is to emulate the 680x0 CPU and make the Amiga work as normal. It uses the Musashi emulator for that. Musashi can emulate several members of the 68k family. By default it is setup to emulate a 68020. In my case I have opted for emulating a 68030 since that also adds a 68881 floating point unit (FPU) to the emulation. Most Amiga software does not need an FPU, but I have always been interested in ray tracing and that kind of computational heavy software always runs better with an FPU present.
The current version of the PiStorm software does not emulate the MMU (Memory Management Unit) of any of the processors that has one (68030/68040/68060). AmigaOS does not expect there to be an MMU in the system; not having one is therefore not a problem at all.
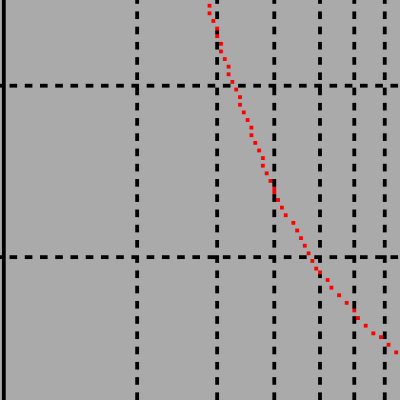
Below is a screenshot from SysInfo showing information on my A500/PiStorm system. SysInfo's speed comparison is designed for classic hardware systems and not for emulated systems. Since the PiStorm is using an emulated CPU the values conjured up by the speed algorithm should not be taken as absolute, but I think that the comparison with other systems is still interesting to see.

It is important to note that the emulated CPU will always run as fast as the Pi can manage - selecting a higher numbered CPU will not necessarily increase the speed of the emulation, it will only affect the functionality of the CPU like adding or removing instructions based on what is offered by the selected CPU.
Fast RAM
The PiStorm software uses the RAM of the Raspberry Pi to add fast RAM to the Amiga. In the default configuration this is 128MB of RAM. Apart from being impossible on a stock Amiga 500, it would also have been an insane amount at the time of the Amiga 500's heyday. Fast RAM is important since it is the only RAM where Amiga programs can run at full speed. There are no bottlenecks at all; it is the same RAM that the emulator software is running in. Any other RAM in the 500 will only be accessible through the 16 bits bus at the standard Amiga chipset speed and will slow down the emulation considerably.
Kickstart ROM
The emulator can load the Kickstart ROM from a file stored on the Pi and use that instead of the ROM that is inside the Amiga. This makes it possible to store multiple ROM files on the Pi and use different ROMs for different configurations. The other benefit is that the ROM will be stored in fast RAM, which is the RAM of the Raspberry Pi itself. This gives the emulated CPU super fast access to the Kickstart ROM since it does not need to go through the 16 bits bus of the Amiga 500 for it. There is also an option in the configuration file for the PiStorm to copy the contents of the physical ROM inside the Amiga to fast RAM in case the Kickstart ROM file cannot be found.
In my case I'm using an image that I made a while back from the Kickstart 3.1 ROM I had in the Amiga 1200 at the time (which at the moment has a Kickstart 3.2 ROM). To create this image I used the "transrom" tool that came with WinUAE. The file created by transrom can be directly used in WinUAE (for which I created it years ago in the first place) but needs to be byte-swapped before it can be used by the PiStorm. To byte-swap it I used the "Byteswap 2" button of the EpromHexxer tool (Windows only).
PiSCSI
The PiStorm can emulate up to 7 SCSI hard disk images to the Amiga. These images can be read from and written to by the Amiga, just like a physical hard disk. By default the drive on SCSI ID 6 contains various drivers and libraries that need to be copied to the Amiga boot disk in order to access some of the other additional functionality. The PiStorm configuration file links each of the SCSI IDs to an image on the Pi's uSD card. And since each Amiga hard disk is just a file on the Raspberry Pi it is possible to copy these files over the network. This allows for simple backup and restore of the Amiga hard disk files, but make sure the emulation software is not running while copying to prevent corruption of the images.
The emulated hard drives are very fast. This is due to the fact that from the emulation software's point of view it is just accessing a local file on the Raspberry Pi. Booting the Amiga from an emulated hard drive following a reset of the Amiga takes only a few seconds.
A314
The A314 was one of the first boards that allowed the use of a Raspberry Pi within an Amiga. The A314 board fits inside the trapdoor slot of the Amiga 500 and offers a pin header slot onto which a Raspberry Pi can be plugged. It uses shared memory that allows the Amiga and the Pi to communicate with each other. The PiStorm software emulates the presence of an a314 so that the Pi on the PiStorm can offer the same functionality as the Pi on the a314.
The a314 interface offers access to a shared folder on the Raspberry Pi. On the Amiga this folder is accessed as the PI0: drive. Reading and writing to the shared folder is much slower than the PiSCSI hard drive, but still plenty fast. This shared folder can make file exchange with the Amiga very simple. Just drop the file in the folder on one system and copy it out of the folder on the other system. There is no need to power down the emulation for this.
There is also direct access to the Linux command shell of the Raspberry Pi. Simply start the "pi" program from the Amiga shell and the Amiga shell is now the Pi's Linux shell. The Pi can now be controlled the same way is you'd normally over SSH. It is also possible to run a single command on the Pi by giving the "pi" program the command to run as an argument. For example, executing "pi ls -l" on the Amiga shell will run the "ls -l" command on the Pi and output the result of the command in the Amiga shell. The screenshot below shows the Linux shell of the Pi in action inside an Amiga shell window.

The a314 communication protocol can also be used to give the Amiga access to the network packets on the network of the Raspberry Pi. More information on this can be found in the "network" section later on in this post.
RTG - ReTargetable Graphics
In short, RTG is a standard that allows Amiga software to use graphic hardware other than the custom chipsets of the Amiga. The PiStorm emulates the presence of an RTG compatible graphical card and uses the display output of the Raspberry Pi as the output of this emulated RTG card.
To make use of this emulated card the P96 graphical system needs to be installed on the Amiga. There is an old version available on Aminet, the current version can be obtained from the Individual Computers online shop. Individual Computers is the license holder of P96 and provides ongoing updates of the P96 RTG software. Please note that their online shop system will show "out of stock" for this item unless you are logged in.
The P96 system will add the new graphics card as a new monitor in "Devs:Monitors". In turn this will add the new graphics card and its choices of resolutions and colour depths to the "Screen Mode" Prefs program. Selecting one of the RTG screen modes will then move the Workbench to the RTG screen. Any software that opens on the Workbench or provides a screen mode selector will be able to open on the RTG screen. Any software accessing the Amiga's display hardware directly (like most games and demos) or using a hard-coded screen mode will always use the Amiga's graphical output and not the screen on an RTG card that may be present.
Network
The network interface of the Raspberry Pi can be accessed by the Amiga via the a314 protocol. On the Amiga side this network access is provided through a SANA-II compatible network driver. SANA-II is the de facto Amiga network device interface standard and is supported by network stacks like AmiTCP, Miami (included with Workbench 3.9) and Roadshow. For the network stack running on the Amiga it looks like the system has its own local network card.
The network is pretty fast too (for Amiga standards). Using Roadshow's "ftp" shell command I downloaded a couple of large files from my local server. The download speed of these varied between 210 kBps and 250 kBps. My testing environment was far from ideal since the access point the Pi was connected to is quite far away.
The network has always been an important method to get files in and out of my Amiga for me. But I find that using the shared folder of the a314 interface is more efficient for me compared to FTP access initiated from the Amiga. In a way there are two different methods of network access for the PiStorm; one is indirectly (via the shared folder), the other directly (via a native network stack on the Amiga).
Using the two Storms
Having the PiStorm external to the machine thanks to the LazarusStorm has been very beneficial. It allowed me to remove it and watch old demos without much hassle. It also allowed for easy access to the HDMI output of the Raspberry Pi so I could plug that into my monitor. This was very handy during the setup of the PiStorm as well as for using the Pi to generate the RTG video signal.
I've only used the system for a couple of weeks now, but I have not found any great worrying compatibility issues. This is not unexpected as the system is more than a year old now and a lot of issues have been ironed out since its inception. It is a community driven project that is still being maintained and improved upon. While I may be thinking that it is feature complete, other people may come up with new functionality that I have never thought about and that will make the PiStorm even more functionally versatile.
Booting the PiStorm does not take too long, even though it is starting a full Linux system. When the Amiga needs to be rebooted the PiStorm does not need rebooting, so it is only on the first power-up that it takes a little longer. I've had a few instances of the Amiga not booting after the PiStorm was powered up. To start the Amiga I had to log on to the Pi and restart the CPU emulator software. This only happened a few times, but it is quite tedious since I don't tend to have a keyboard attached to the Raspberry Pi. I have also managed to power off the Amiga without remembering to power down the Pi first. This has so far not lead to any issues with the Pi's file system, but is something that should be avoided.
With the PiStorm the Amiga 500 is faster than my accelerated A1200. But the 1200 takes less space on the desk and has the added bonus of the Indivision flicker fixer, which allows me to use native high resolution screens. Well, I say high resolution, it still is only 1024 x 768, but that is not that much smaller compared to the PiStorm's default of 1280 x 720. My issue with the Pi based RTG is that it started to make me wonder what the rest of the Amiga was there for, as it was all happening on the Pi now. Might as well remove the old girl and switch over to a Pimiga system? In any case, that's a personal thing and don't let that change the way you think about RTG or PiStorms.
If all I had was the Amiga 500 then the PiStorm would see itself in constant use, only to be removed for compatibility reasons. But since I do have the Amiga 1200 the improvements of the PiStorm are not big enough for me to give up the extra desk space the 1200 gives me, I expect the 1200 to be back on the desk as soon as I've gotten too annoyed with the lack of space. This will of course all change when the development of the PiStorm32 reaches a stage where the developers will be happy to share the design - then I can have the A1200 and a PiStorm on my desk at the same time...