tech.jpg)
Initially while working on my article about the Multi-Evolution SCSI controller for the Amiga 500 I had bought a very cheap 2nd hand SCSI hard drive on E-bay. The drive did not have the correct connector for use with the Multi-Evolution, but another E-bay session later and I had acquired a cheap convertor PCB that fixed the issue. The hard drive then refused to spin up properly, mainly because it required considerably more current than the Amiga 500 was designed to source. Back to E-bay to find me another drive... Luckily, the second one I bought could use the same pin convertor, span up and was recognised by the controller, so I put that one to the side for writing the article.
While it made an interesting subject for an article, I had now also learned that finding a cheap and working 2nd hand SCSI hard drive that was also compatible with my setup was not straightforward. For each potential drive I found I now also had to search the Internet for the specifications and check that the spin-up current was not too high. For my article I intended to write about something other people could do as well, while my working 2nd hand drive started to feel more like some one-off I had been lucky enough to find. So I looked around for a solution that depended less on random 2nd hand finds on auction sites.
I knew about projects like SCSI2SD, which emulates a SCSI hard drive while using an SD card as the actual data storage medium, but found the boards quite pricey. While searching for a cheaper alternative I came across the RaSCSI project.
RaSCSI
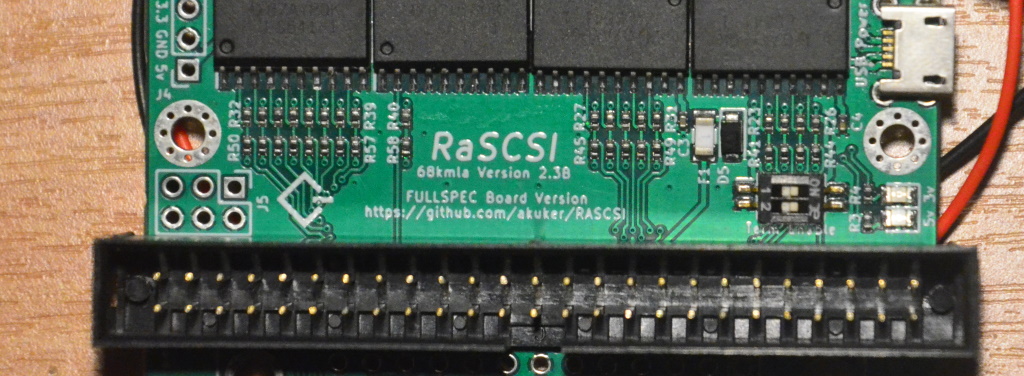
Simply said, the RaSCSI project uses a Raspberry Pi single board computer to emulate a SCSI device. The micro-SD card of the Raspberry Pi is used to store the images for the devices emulated by the RaSCSI software running on the Pi. With the help of a simple PCB the Raspberry Pi can be connected to the SCSI bus of the controller. The main reason for the PCB is to convert between the 3.3V signals of the Raspberry Pi and the 5V signals of the SCSI bus. Any model of Raspberry Pi with a 40 pin GPIO header will work.
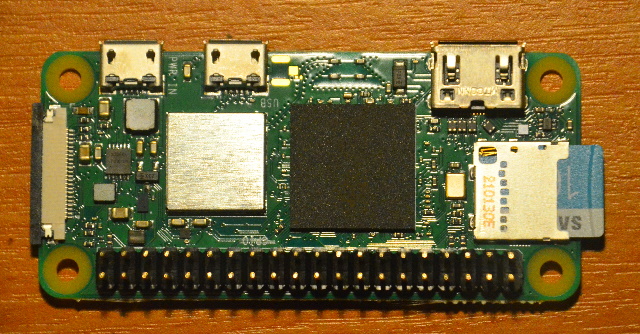
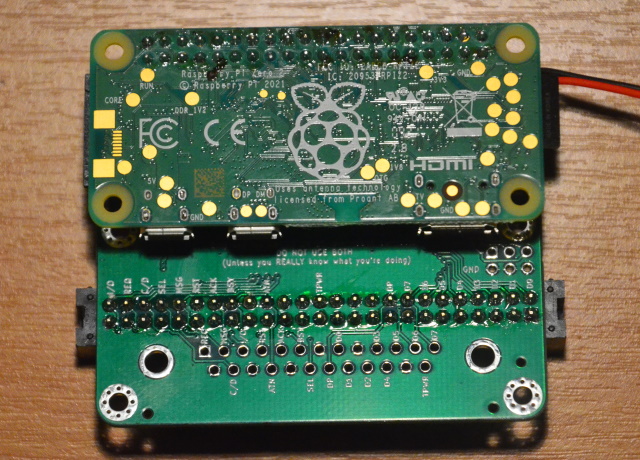
The Raspberry Pi runs a full Linux OS and can therefore be connected to a (wireless) network while it is emulating SCSI devices. This allows the drive images to be backed up over the network without too much hassle. The RaSCSI software provides a local web based configuration page that can be used to change the configuration of the emulated devices. I'm using a Raspberry Pi Zero 2 (shown below). This version of the Pi is small but has on-board WiFi and its 4 core processor has more than enough grunt for this task.
The RaSCSI project is intended for Apple Macintosh computers and not all functionality provided by the RaSCSI software may be compatible with the Amiga (yet?). The Macintosh for example supports SCSI Ethernet devices, while the Amiga unfortunately lacks drivers for these.
Setting up the Pi
Setting up the Raspberry Pi for use with the RaSCSI hardware is very straightforward. Especially so since the maintainers of the project provide a pre-configured image that can be written to a micro-SD card directly. To find the latest image go to the project's releases page, which will have the most recent release at the top. Scroll down to the "assets" section. Use a PC to download the large zip file (usually just over 580MB in size) and then use something like Etcher to write the image to a micro-SD card.
Setting up WiFi
Before inserting the card into the Raspberry Pi you can setup the WiFi configuration for the Pi so that it will connect to the network immediately after booting. This can be done by creating a file named "wpa_supplicant.conf" in the "boot" partition of the micro-SD card. The contents of the file will need to reflect the settings for the local wireless network:
ctrl_interface=DIR=/var/run/wpa_supplicant GROUP=netdev
update_config=1
country=GB
network={
    ssid="NETWORKNAME"
    psk="PASSWORD"
    scan_ssid=1
}
Replace NETWORKNAME with the SSID of your wireless network and replace PASSWORD with the password used by the network. Keep the quotation marks. Please also make sure to set the correct country code where it says GB in the above example. The Adafruit website has some more detailed information on setting up WiFi for the Raspberry Pi.
Boot the Pi
Use the OS functionality of your PC to unmount / eject the micro-SD card safely and take the card from the PC. Insert the micro-SD card in the slot of the Raspberry Pi and power up the Pi. This can be done with the Pi already connected to the RaSCSI hardware, but it may be easier to finish all the setup before placing it all inside the SCSI controller enclosure.
On power up the Pi should boot and connect to the WiFi network automatically. If your Pi is not connected to a monitor at this point then you may need to check the DHCP client list on your network router to find out what the Pi's IP address is. Then you can use the IP address with an SSH client (like for example PuTTY) to connect to the Pi.
Change the password
The default user is "pi" (without the quotation marks), which is a pain to change. Most examples and tutorials on the web expect the username to be "pi" so leaving it as-is is usually the best option. The default password is "raspberry". Leaving that unchanged is of course not a good idea at all. The first action after logging on to the Pi should therefore be the changing of the password. This can be done with the raspi-config tool, or via the passwd command:
> passwd
Changing password of pi.
Current password:
New password:
Retype new password:
passwd: password updated successfully
Fix the IP address
At the moment the Pi is setup to request a dynamic IP address from a DHCP server. In most cases the DHCP server functionality is provided by the network router. Using a dynamic IP address means that it may be different each time the pi is powered up. It is much more convenient to have the Pi always on the same IP address since that makes connecting to the web based RaSCSI configuration page so much simpler.
The "DHCP client deamon" is in charge of setting the IP address and its configuration file is named dhcpcd.conf and can be found in the /etc directory. The file can be edited with any text editor, like for example "nano":
> sudo nano /etc/dhcpcd.conf
At the bottom of the text file there will be a section called "Example static IP configuration". Place the new IP address section for the WiFi directly under it:
interface wlan0
static ip_address=10.0.0.7/24
static routers=10.0.0.1
static domain_name_servers=10.0.0.1 8.8.8.8
The above snippet sets the static IP address for the Pi to "10.0.0.7" and expects the address of the network router to be "10.0.0.1". It is unlikely that these both happen to be correct for your network so please substitute these addresses for the correct ones for your network. When you choose the static IP address for the Pi, please make sure that it is not one from within the range used by the DHCP server on your network.
Press CTRL+x to close the editor, select 'Y' to save your changes when asked and press the enter key to save the new file in place of the original file. Now the Pi can be rebooted:
> sudo reboot
If all has gone well then the Pi will now connect to the network and use the static IP address.
Creating a SCSI hard disk image
After the Pi has finished its boot process the RaSCSI service can be accessed via its web pages. These pages can be accessed by typing the static IP address of the Raspberry Pi in a web browser.
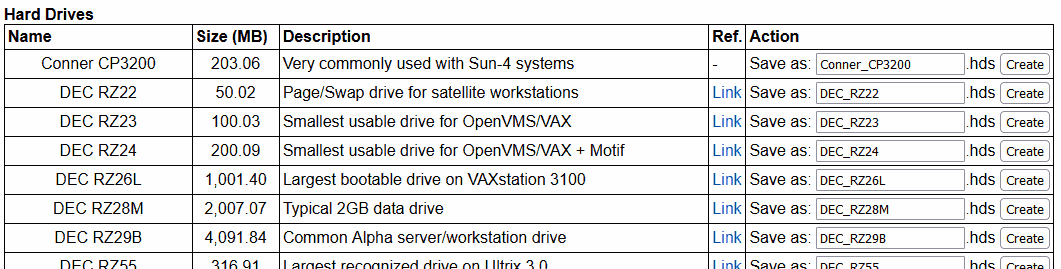
When the page has loaded, scroll down to the section named "Create Named Drive" and click the "Create a named disk image that mimics real-life drives" link under it:

Clicking the link will bring up a new page where a choice can be made from a number of profiles for existing hard drives. Each of these profiles will emulate an existing hard drive as close as possible. To keep things simple I chose the DEC RZ28M drive since a size of 2GB should be compatible with most Amiga controllers. Firmware and drivers will use 32 bits numbers and for unsigned integers that gives a range from 0 to 4.29 GB. However, if signed integers were used instead then the range is from -2.15 GB to 2.15 GB and this could lead to data corruption for anything larger than 2.15 GB, hence my 2 GB choice of disk size.
To choose a drive click the "Create" button on the end of its row in the table:
The newly create image has now been added to the images table near the top of the RaSCSI configuration page (2nd row from the top):
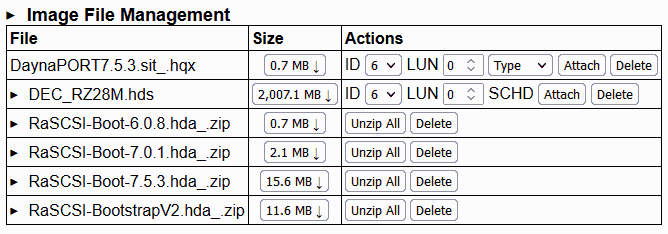
To add the image to the ones accessible to the SCSI controller I changed the ID of the image to "0" (since that is where my controller starts checking) and clicked the "Attach" button. The image now shows up in the table at the top of the page:
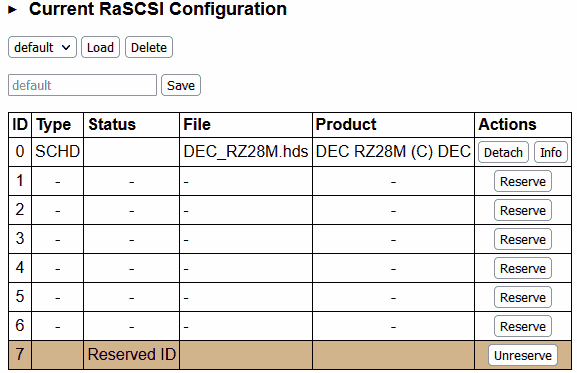
Then, to save the current configuration I clicked the "Save" button. This ensures that next time the Pi is started it will automatically load this configuration and have the 2 GB image setup on SCSI ID 0.
Now with everything prepared the Raspberry Pi can be shutdown using the button at the very bottom of the page. The Pi will show that it has finished the shutdown process by flashing its power light a couple of times, leaving the light on a bit longer on the last flash.
Plugging it all in
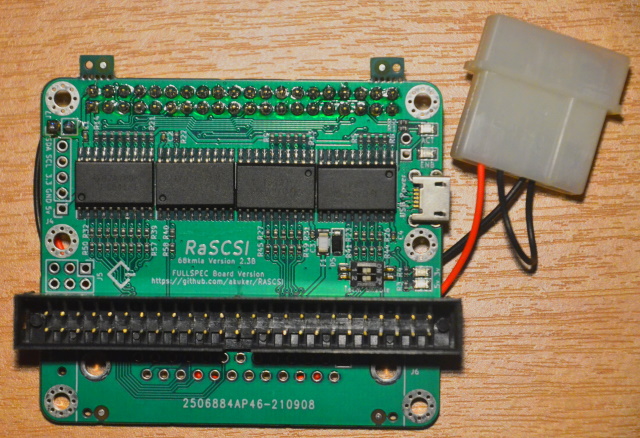
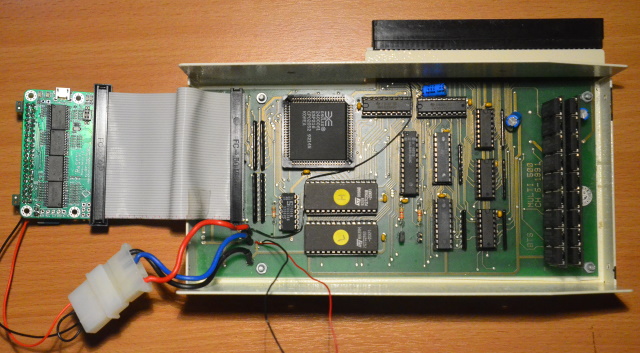
The power cable of the Pi can be removed after the shutdown process has ended. Then the Raspberry Pi can be plugged into the bottom of the RaSCSI board - the 40 pin GPIO header on the Pi can be plugged straight into the 40 pin socket on the bottom of the RaSCSI board as shown below:
The RaSCSI board can now be connected to the SCSI controller via the 50-pin cable. The photograph below shows the RaSCSI connected with my MacroSystem Multi-Evolution controller. In my setup the controller will also power the RaSCSI board and therefore also the Raspberry Pi (more on this a little later). The controller can now also be connected to the Amiga.
Powering up
Since we are dealing with bare boards, before powering up it is important to make sure that nothing else is touching the boards that could create a short circuit. After a double check to see that everything is connected properly the PSU of the Amiga can be turned on.
Both the Raspberry Pi and the Amiga will power up and the Pi will start its boot process. This will take a while and in the mean time the Amiga will wait for SCSI devices to become available. At some point the Pi is ready and the SCSI device with unit ID "0" will become available. The Amiga won't yet be able to boot from it since it has not yet been partitioned and formatted and does not contain the Amiga Workbench. The floppy that came with the Multi-Evolution controller boots into Workbench so I used that to boot the Amiga.
Installing Workbench
The new, empty, hard drive provided by the RaSCSI first needs to be partitioned and then formatted. How this is done depends on the SCSI controller. In my case I will need to run the "SCSIInstall" tool that can be found on the Multi-Evolution install disk. This tool will partition the hard drive, format the partitions, and finally copy the contents of my favourite Workbench disk to the first partition on the hard drive. At the end it reboots the Amiga so that it can boot from the hard drive image for the very first time.
While I have been playing with all this I had a few instances where the Amiga would not boot into Workbench, but simply show a CLI window with a prompt. The cause of this was that the system booted from another partition, one that did not have Workbench on it. This is likely due to the way the Multi-Evolution works and was easily fixed by running the "SCSIBoot" tool from the controller's install disk. This tool allowed me to select the correct partition as the boot partition and from then on it all worked as expected.
Performance
The Multi-Evolution install disk also contains the DiskPerf program, originally from Fish disk number 187. The program executes a number of basic performance tests and then prints the result. I have run the test with the RaSCSI using the Raspberry Pi Zero 2, but also with the RaSCSI using an old Raspberry Pi 1B+. This 1B+ was the Pi I used to set everything up initially and only switched to the Zero 2 at a later stage. For comparison I have also run the test with the Quantum LPS52 hard drive that was always used with this system. The RaSCSI software on the Pi is the December 2021 release.
The table below shows how many times a particular action could be performed per second.
| Quantum LPS52 | Raspberry Pi 1B+ | Pi Zero 2 | |
| Files created per sec | 18 | 40 | 41 |
| Files deleted per sec | 166 | 166 | 166 |
| Directory entries scanned | 125 | 125 | 125 |
| Seek/reads per sec | 179 | 170 | 177 |
Most of the values are either the same or in the same ballpark, with the only outlier being the number of files created per second on the Quantum LPS52 hard disk. This can be easily explained by the fact that this hard disk has a lot of files on it already, with the free space likely being quite fragmented. But since this is my old hard drive from back in the day I'm not prepared to either clear the drive or to defrag it.
The following table shows the throughput (bytes per second) for different buffer sizes:
| Buffer (bytes) | Quantum LPS52 | Raspberry Pi 1B+ | Pi Zero 2 | |||
| Read | Write | Read | Write | Read | Write | |
| 512 | 133293 | 28111 | 118038 | 61620 | 124830 | 65196 |
| 4096 | 370085 | 183424 | 273541 | 289928 | 355449 | 306900 |
| 8192 | 524288 | 287281 | 361577 | 374491 | 503316 | 395689 |
| 32768 | 655363 | 480263 | 446202 | 469511 | 635500 | 499321 |
| 131072 | 838860 | 610820 | 491520 | 537731 | 683853 | 547083 |
| 524288 | 873813 | 731564 | 476625 | 551882 | 706905 | 577196 |
The throughput numbers show that the Raspberry Pi 1B+ is slower than the Pi Zero 2, something not unexpected as the Pi Zero 2 has more cores that each are faster than the one core of the Pi 1B+. The Pi Zero 2 writes faster than the real HDD, but reads slightly slower. This may be a red herring again due to the fragmentation on the old HDD.
In the end I'm not planning to use buffers that are half a megabyte in size on a system that only has 3 megabyte of memory in total. From the above numbers it seems that with buffers of 32768 bytes I will get a decent performance while throwing more memory at it won't make that much noticeable difference. The law of diminishing returns seems to be at work here.
Conclusion
Using the RaSCSI makes my Amiga 500 suddenly nice and quiet now that the old noisy Quantum is no longer part of the setup. Being able to create new disk images over the WiFi adds new flexibility as does backing up and restoring disk images over WiFi. It is also possible to upload a CD-ROM ISO image to emulate a CD-ROM drive, which is something I will give a go at a later date. In use the system does not feel slower (nor faster) than the original setup with the Quantum, which was always fast enough for me.
The reason I opted to power the RaSCSI from the SCSI controller is that it requires no additional cables into the controller. There are a number of ventilation slits in the case of the controller, but nothing large enough to allow a micro-USB plug through. That would not stop me from making my own power cable of course, but I don't like the idea of having the additional cable where there never used to be one.
However, powering the Raspberry Pi from the Amiga has its drawbacks. On first power-up the Amiga will have to wait for the Pi to finish its boot process. In my case the Multi-Evolution controller will just keep scanning the SCSI bus until the boot device is present, and then the Amiga will boot from the image on the RaSCSI without a problem. Had the Pi already been powered up then the Amiga would not need to wait for it.
The boot-wait is not too bad, but the real problem is with turning the Amiga off. Since the Amiga is powering the Raspberry Pi, turning off the power for the Amiga will also immediately turn off the Pi, without shutting it down properly. This can lead to a corrupt (or even defective) micro-SD card. It is therefore important to always shutdown the Pi (and ensure it has indeed finished the shutdown process) before turning off the Amiga. Will I remember to do that every single time? I sincerely doubt it! But the future will tell me. If the card in the Raspberry Pi gets corrupted too often then I'll just have to suffer the additional cable on my desk. But before that happens I'll use it this way.